Helm
Setup
We will be using a virtual machine in the faculty's cloud.
When creating a virtual machine in the Launch Instance window:
- Name your VM using the following convention:
cc_lab<no>_<username>, where<no>is the lab number and<username>is your institutional account. - Select Boot from image in Instance Boot Source section
- Select CC Template in Image Name section
- Select the g.medium flavor.
Create a local Kubernetes cluster using the kind create cluster command:
student@lab-kubernetes:~$ kind create cluster
Creating cluster "kind" ...
 ✓ Ensuring node image (kindest/node:v1.23.4) 🖼
 ✓ Preparing nodes 📦
 ✓ Writing configuration 📜
 ✓ Starting control-plane 🕹️
 ✓ Installing CNI 🔌
 ✓ Installing StorageClass 💾
Set kubectl context to "kind-kind"
You can now use your cluster with:

kubectl cluster-info --context kind-kind

Thanks for using kind! 😊
It is recommended that you use port-forwarding instead of X11 forwarding to interact with the UI.
What is Helm?
Package managers are tools used to help with the installation and management of software packages and dependencies. Linux, depending on the installed distribution, has apt (Ubuntu & Debian), dnf (Fedora, Redhat & CentOS) or pacman (Arch). Even for programming languages we use package managers to install libraries, such as pip for Python or npm for JavaScript.
Kubernetes has its own package manager called Helm. Helm simplifies the deployment and management of applications inside a Kubernetes cluster by packaging them in charts, which are reusable, configurable and versioned templates.
Artifact Hub
Artifact Hub is a centralized platform for discovering and sharing Kubernetes packages, including Helm charts, operators, and plugins.
It allows users to explore and install Helm charts from various repositories, simplifying application deployment.
Helm can connect to Artifact Hub by adding repositories listed there using helm repo add, making chart management more accessible.
Installing Helm
Helm is already installed on our VMs. Use helm version to check that the tool was successfully installed:
student@lab-helm:~$ helm version
version.BuildInfo{Version:"v4.1.0", GitCommit:"4553a0a96e5205595079b6757236cc6f969ed1b9", GitTreeState:"clean", GoVersion:"go1.25.6", KubeClientVersion:"v1.35"}
If you want to install Helm on your computers, follow the installation link from here.
Helm offers a cheat sheet with the basic commands necessary to manage an application.
Intro to Helm
Charts
Throughout all the examples and exercises, please be careful to follow the instructions the charts give you at the end of their installation.
The packaging format used by Helm is called chart. A chart is a collection of files describing a set of Kubernetes resources. One chart can package a simple resource, like a pod, or complex resources, like entire applications.
CRDs - Custom Resource Definitions
CRDs are extensions of the Kubernetes API that allow users to define their own resources.
We can use CRDs to define new types of data or libraries and interact with them directly using kubectl.
More details about CRDs can be found here.
Chart vs Deployment
A Kubernetes Deployment is a resource that manages the lifecycle of a set of pods.
A chart is a collection of files called templates that can include multiple Kubernetes resources (i.e. Deployments, Services, ConfigMaps etc.).
In the following example we will deploy Elastic using the two methods - using the Elastic operator and using the Elastic Helm chart.
Elastic Kubernetes Deployment
Firstly, we install the custom resource definition for Elastic using create:
student@lab-helm:~$ kubectl create -f https://download.elastic.co/downloads/eck/2.16.1/crds.yaml
customresourcedefinition.apiextensions.k8s.io/agents.agent.k8s.elastic.co created
customresourcedefinition.apiextensions.k8s.io/apmservers.apm.k8s.elastic.co created
customresourcedefinition.apiextensions.k8s.io/beats.beat.k8s.elastic.co created
customresourcedefinition.apiextensions.k8s.io/elasticmapsservers.maps.k8s.elastic.co created
customresourcedefinition.apiextensions.k8s.io/elasticsearches.elasticsearch.k8s.elastic.co created
customresourcedefinition.apiextensions.k8s.io/enterprisesearches.enterprisesearch.k8s.elastic.co created
customresourcedefinition.apiextensions.k8s.io/kibanas.kibana.k8s.elastic.co created
customresourcedefinition.apiextensions.k8s.io/logstashes.logstash.k8s.elastic.co created
Afterwards, we install the Elastic operator using apply:
student@lab-helm:~$ kubectl apply -f https://download.elastic.co/downloads/eck/2.16.1/operator.yaml
Warning: resource namespaces/elastic-system is missing the kubectl.kubernetes.io/last-applied-configuration annotation which is required by kubectl apply. kubectl apply should only be used on resources created declaratively by either kubectl create --save-config or kubectl apply. The missing annotation will be patched automatically.
namespace/elastic-system configured
serviceaccount/elastic-operator created
secret/elastic-webhook-server-cert created
configmap/elastic-operator created
clusterrole.rbac.authorization.k8s.io/elastic-operator created
clusterrole.rbac.authorization.k8s.io/elastic-operator-view created
clusterrole.rbac.authorization.k8s.io/elastic-operator-edit created
clusterrolebinding.rbac.authorization.k8s.io/elastic-operator created
service/elastic-webhook-server created
statefulset.apps/elastic-operator created
validatingwebhookconfiguration.admissionregistration.k8s.io/elastic-webhook.k8s.elastic.co created
Afterwards, we can monitor the operator's setup from its logs, using logs:
student@lab-helm:~$ kubectl -n elastic-system logs -f statefulset.apps/elastic-operator
We can check that the operator is ready by using get and checking that the operator pod is Running:
student@lab-helm:~$ kubectl get -n elastic-system pods
NAME                 READY   STATUS    RESTARTS   AGE
elastic-operator-0   1/1     Running   0          3m51s
Run delete to remove all the Elastic resources.
student@lab-helm:~$ kubectl delete -f https://download.elastic.co/downloads/eck/2.16.1/operator.yaml
student@lab-helm:~$ kubectl delete -f https://download.elastic.co/downloads/eck/2.16.1/crds.yaml
Elastic Helm Chart
Now we will deploy Elastic using Helm. Firstly, we will add the Elastic Helm repository to the package sources, and update the tool.
student@lab-helm:~$ helm repo add elastic https://helm.elastic.co
student@lab-helm:~$ helm repo update
student@lab-helm:~$ helm repo list
NAME    	URL
headlamp	https://kubernetes-sigs.github.io/headlamp/
elastic 	https://helm.elastic.co
Then we will use helm install to install the Elastic chart:
student@lab-helm:~$ helm install elastic-operator elastic/eck-operator -n elastic-system --create-namespace
NAME: elastic-operator
LAST DEPLOYED: Mon Mar 17 21:27:22 2025
NAMESPACE: elastic-system
STATUS: deployed
REVISION: 1
TEST SUITE: None
NOTES:
1. Inspect the operator logs by running the following command:
   kubectl logs -n elastic-system sts/elastic-operator
And we will check that the operator is running by looking at its logs, using kubectl logs:
student@lab-helm:~$ kubectl logs -n elastic-system sts/elastic-operator
{"log.level":"info","@timestamp":"2025-03-17T21:27:24.304Z","log.logger":"manager","message":"maxprocs: Updating GOMAXPROCS=1: determined from CPU quota","service.version":"2.16.1+1f74bdd9","service.type":"eck","ecs.version":"1.4.0"}
{"log.level":"info","@timestamp":"2025-03-17T21:27:24.304Z","log.logger":"manager","message":"Setting default container registry","service.version":"2.16.1+1f74bdd9","service.type":"eck","ecs.version":"1.4.0","container_registry":"docker.elastic.co"}

[...]

{"log.level":"info","@timestamp":"2025-03-17T21:27:35.818Z","log.logger":"resource-reporter","message":"Created resource successfully","service.version":"2.16.1+1f74bdd9","service.type":"eck","ecs.version":"1.4.0","kind":"ConfigMap","namespace":"elastic-system","name":"elastic-licensing"}
{"log.level":"info","@timestamp":"2025-03-17T21:27:35.820Z","log.logger":"manager","message":"Orphan secrets garbage collection complete","service.version":"2.16.1+1f74bdd9","service.type":"eck","ecs.version":"1.4.0"}
As we can see, the Elastic operator is running, something that can be seen using kubectl get pods as well:
student@lab-helm:~$ kubectl get pods -n elastic-system
NAME                 READY   STATUS    RESTARTS   AGE
elastic-operator-0   1/1     Running   0          3m44s
Exercise: Deploy Podinfo
- Deploy Podinfo using Helm and access its frontend to test your deployment.
Use the
ghcr.ioinstall.
Run the kubectl command the deployment tells you to run to expose the service and make it accessible from outside the cluster.
To access the frontend for podinfo, connect to the OpenStack VM using -L [local-port]:localhost:8080.
# Forward local port 1080 to the port that you forward Kubernetes service to.
student@local-machine:~$ ssh -J fep -L 1080:localhost:8080 student@[ip_vm]
If you have issues accessing the Podinfo frontend from Firefox, try a different browser.
Values
Charts offer the possibility to parameterize values inside their templates.
Values are a great way to customize charts and make them portable, allowing us to set different parameters with specific values that are used in our deployments.
We can find the parameters and their default values for each chart in the values.yaml file.
We can pass values to charts in two ways: using --set during the helm install of a chart, or passing a file with the values using helm install -f my-values.yaml.
Let's start from a simple chart. We use helm create to create our own chart:
student@lab-helm:~$ helm create my-chart
Creating my-chart
We now have a chart created with all its files:
student@lab-helm:~$ tree my-chart/
my-chart/
├── charts                        # A directory containing any charts upon which this chart depends.
├── Chart.yaml                    # A YAML file containing information about the chart
├── templates                     # A directory of templates that will generate valid Kubernetes manifest files.
│   ├── deployment.yaml           # The manifest of the deployment
│   ├── _helpers.tpl              # File containing helper function for setting different values for the template
│   ├── hpa.yaml                  # Horizontal Pod Autoscaler
│   ├── ingress.yaml              # Ingress configuration
│   ├── NOTES.txt                 # Chart installation notes, displayed after a successful installation to give the next steps
│   ├── serviceaccount.yaml       # The setup of a service account
│   ├── service.yaml              # The manifest of the service
│   └── tests                     # A directory containing tests for the chart
│       └── test-connection.yaml
└── values.yaml                   # The default configuration values for this chart.

3 directories, 10 files
Now we will create a ConfigMap template in our chart templates:
student@lab-helm:~/my-chart/templates$ touch config.yaml
student@lab-helm:~/my-chart/templates$ cat config.yaml
apiVersion: v1
kind: ConfigMap
metadata:
  name: test-configmap
data:
  message: {{ .Values.message }}
  drink: {{ .Values.favoriteDrink }}
  desert: {{ .Values.favoriteDesert }}
We added three values in our template that we can configure.
We now have to define default values for them in values.yaml:
student@lab-helm:~/my-chart$ cat values.yaml

[...]

# Additional volumeMounts on the output Deployment definition.
volumeMounts: []
# - name: foo
#   mountPath: "/etc/foo"
#   readOnly: true

nodeSelector: {}

tolerations: []

affinity: {}

message: "Hello, dear customer!"

favoriteDrink: "Cola"

favoriteDesert: "Apple Pie"
If we install this chart in debug mode we will see that the parameterize values in our template are replaced with the default ones:
student@lab-helm:~$ helm install test ./my-chart --dry-run=client --debug

[...]

---
# Source: my-chart/templates/configmap.yaml
apiVersion: v1
kind: ConfigMap
metadata:
  name: test-configmap
data:
  message: Hello, dear customer!
  drink: Cola
  desert: Apple Pie
---

[...]
We can use --set to manually set a parameter to a value that we want during install:
student@lab-helm:~$ helm install test ./my-chart --dry-run=client --debug --set favoriteDrink=tea --set favoriteDesert="fruit salad"

[...]

---
# Source: my-chart/templates/configmap.yaml
apiVersion: v1
kind: ConfigMap
metadata:
  name: test-configmap
data:
  message: Hello, dear customer!
  drink: tea
  desert: fruit salad
---

[...]
And lastly, we can use a custom values file for easier management of parameters:
student@lab-helm:~$ cat myvals.yaml
message: Hello from values file!
favoriteDrink: lemonade
favoriteDesert: chocolate mouse
student@lab-helm:~$ helm install test -f myvals.yaml ./my-chart --dry-run=client --debug

[...]

---
# Source: my-chart/templates/configmap.yaml
apiVersion: v1
kind: ConfigMap
metadata:
  name: test-configmap
data:
  message: Hello from values file!
  drink: lemonade
  desert: chocolate mouse
---

[...]
Exercise: Customize Podinfo
- Starting from the previous Podinfo Helm deployment, use
--setto manually configure thereplicaCountto5and the UI message (the parameter isui.message) from the home page to a custom one. - Now do the same, but this time use a values file.
You can check the replicaCount by using kubectl describe deployment -n [my-podinfo-namespace] [my-podinfo-deployment-name].
You can check the UI message using curl as well: curl localhost:8080 (after running the kubectl port-forward command).
Once you are done, uninstall the chart to not overload the resources on your virtual machine.
You can do this by using helm list -A to get the namespace and name of the installed chart, and helm uninstall -n <namespace> <chart_name> to uninstall the chart.
Values - Advanced
Now that we saw how values work, it is time to dig a bit deeper into their strengths. Making use of values, we can impose conditions in our templates. Conditions can help us isolate parts of our deployements based on our requirements. Moreover, Helm charts give us the posibility to use loops, leading to easier templating of repetitive parts for our deployments.
Conditions
Let's return to our chart from before:
student@lab-helm:~/my-chart/templates$ cat config.yaml
apiVersion: v1
kind: ConfigMap
metadata:
  name: test-configmap
data:
  message: {{ .Values.message }}
  drink: {{ .Values.favoriteDrink }}
  desert: {{ .Values.favoriteDesert }}
Now, let's begin by adding a condition displaying a special additional message if it is the weekend:
student@lab-helm:~/my-chart/templates$ cat config.yaml
apiVersion: v1
kind: ConfigMap
metadata:
  name: test-configmap
data:
  message: {{ .Values.message }}
  {{- if .Values.weekend.enabled }}
  specialMessage: "Special deal for fruit tarts!"
  {{- end }}
  drink: {{ .Values.favoriteDrink }}
  desert: {{ .Values.favoriteDesert }}
Now we have to define the default value for the new parameter in values.yaml.
student@lab-helm:~/my-chart$ cat values.yaml

[...]

# Added value
weekend:
  enabled: false

message: "Hello, dear customer!"

favoriteDrink: "Cola"

favoriteDesert: "Apple Pie"
If we test our chart now, we will see that nothing is changed from before:
student@lab-helm:~$ helm install test ./my-chart --dry-run=client --debug

[...]

---
# Source: my-chart/templates/configmap.yaml
apiVersion: v1
kind: ConfigMap
metadata:
  name: test-configmap
data:
  message: Hello, dear customer!
  drink: Cola
  desert: Apple Pie
---

[...]
But now let's set the value of weekend.enabled to true:
student@lab-helm:~$ helm install test ./my-chart --dry-run=client --debug --set weekend.enabled=true

[...]

---
# Source: my-chart/templates/configmap.yaml
apiVersion: v1
kind: ConfigMap
metadata:
  name: test-configmap
data:
  message: Hello, dear customer!
  specialMessage: "Special deal for fruit tarts!"
  drink: Cola
  desert: Apple Pie
---

[...]
We can see that the chart has loaded the specialMessage now.
Loops
Loops come in handy when we want to define templates where we require lots of variables, such as environment variables.
Using range we can simplify the template's design, keeping it cleaner and easier to read and write.
Let's extend the ConfigMap from our chart to make use of loops.
student@lab-helm:~/my-chart/templates$ cat config.yaml
apiVersion: v1
kind: ConfigMap
metadata:
  name: test-configmap
data:
  message: {{ .Values.message }}
  {{- if .Values.weekend.enabled }}
  specialMessage: "Special deal for fruit tarts!"
  {{- end }}
  drinksMenu:
    {{- range .Values.menu.drinks}}
    name: {{ .name }}
    price: {{ .price}}
    {{- end }}
  desertsMenu:
    {{- range .Values.menu.deserts}}
    name: {{ .name }}
    price: {{ .price }}
    {{- end }}
student@lab-helm:~/my-chart/templates$ cd .. && cat values.yaml

[...]

weekend:
  enabled: false

message: "Hello, dear customer!"

favoriteDrink: "Cola"

favoriteDesert: "Apple Pie"

menu:
  drinks:
    - name: "Cola"
      price: "5 lei"
    - name: "Tea"
      price: "15 lei"
    - name: "Coffee"
      price: "17 lei"
  deserts:
    - name: "Chocolate Cake"
      price: "25 lei"
    - name: "Cheese Cake"
      price: "26 lei"
We modified the ConfigMap, adding two loops to create a menu.
As the entries in each of the categories follow the same structure, we can add just the generic format and loop over the values given in values.yaml to create and fill new entries.
Deploying this chart, we will see that entries were created for each pair in the drinks and deserts categories:
student@lab-helm:~$ helm install test ./my-chart --dry-run=client --debug

[...]

---
# Source: my-chart/templates/configmap.yaml
apiVersion: v1
kind: ConfigMap
metadata:
  name: test-configmap
data:
  message: Hello, dear customer!
  drinksMenu:
    name: Cola
    price: 5 lei
    name: Tea
    price: 15 lei
    name: Coffee
    price: 17 lei
  desertsMenu:
    name: Chocolate Cake
    price: 25 lei
    name: Cheese Cake
    price: 26 lei
---

[...]
Exercise: Nginx Advanced Deployment
Create a new Helm chart using helm create nginx-advance.
This will create an example Nginx template starting from which you will have to do the following:
- Create a ConfigMap for your Nginx chart (you should create it in
~/nginx-advanced/templates) that can be used to configureindex.html. You can follow the example:
apiVersion: v1
kind: ConfigMap
metadata:
  name: nginx-configmap
data:
  index.html: |
    <h1>Hello, World!</h1>
- Update the values file (found in
~/nginx-advance/values.yaml) to add thevolumeandvolumeMountyou have created with the ConfigMap. ThemountPathis /usr/share/nginx/html. Follow this template:
# Additional volumes on the output Deployment definition.
volumes:
  - name: [volume-name]
    configMap:
      name: [ConfigMap-name]

volumeMounts:
  - name: [volume-name]
    mountPath: /usr/share/nginx/html
- Deploy the chart and check the landing page and follow the steps given at the end of the deployment to setup the port-forwarding for the server.
student@lab-helm:~$ helm install nginx-chart ./nginx-advance

[...]

1. Get the application URL by running these commands:
  export POD_NAME=$(kubectl get pods --namespace default -l "app.kubernetes.io/name=harder-chart,app.kubernetes.io/instance=harder" -o jsonpath="{.items[0].metadata.name}")
  export CONTAINER_PORT=$(kubectl get pod --namespace default $POD_NAME -o jsonpath="{.spec.containers[0].ports[0].containerPort}")
  echo "Visit http://127.0.0.1:8080 to use your application"
  kubectl --namespace default port-forward $POD_NAME 8080:$CONTAINER_PORT
You can run kubectl --namespace default port-forward $POD_NAME 8080:$CONTAINER_PORT & to have the port-forwarding running in the background, but you will have to manually stop it by using ps aux | grep kubectl to get its PID and running kill -9 PID.
Run the same commands everytime you update the chart.
- Update the chart so that the content of the Nginx server html pages is parameterized (can be set using values).
The parameter will have the following name:
pageContent.indexPage. To redeploy the chart you can usehelm upgrade:
student@lab-helm:~$ helm upgrade nginx-chart ./nginx-advance
Release "nginx-chart" has been upgraded. Happy Helming!
NAME: nginx-chart
LAST DEPLOYED: Thu Mar 20 20:20:32 2025
NAMESPACE: default
STATUS: deployed
REVISION: 5
NOTES:
1. Get the application URL by running these commands:
  export POD_NAME=$(kubectl get pods --namespace default -l "app.kubernetes.io/name=nginx-advance,app.kubernetes.io/instance=nginx-chart" -o jsonpath="{.items[0].metadata.name}")
  export CONTAINER_PORT=$(kubectl get pod --namespace default $POD_NAME -o jsonpath="{.spec.containers[0].ports[0].containerPort}")
  echo "Visit http://127.0.0.1:8080 to use your application"
  kubectl --namespace default port-forward $POD_NAME 8080:$CONTAINER_PORT
- Add another page in the ConfigMap that is added only when a condition is true.
The name and contents of the page are up to you (it is html so have fun with it), but it should be parameterized (similar to
index.html). Test your chart by running it and accessing the pages (index.html is accessed by going to http://localhost:8080, and other pages are accessed by going to http://localhost:8080/[page-name].html)
Chart Versioning
Helm offers us the possibility to keep track of different versions of our charts by using versioning.
The version of a chart is given by the parameter version found in the Chart.yaml file in the root of our chart.
Making use of the version we can upgrade charts or rollback to certain versions.
Let's start with the chart from the previous exercise.
Running helm history [chart-deployment-name] we will get to see the release history of our charts.
student@lab-helm:~/nginx-advanced$ helm history nginx-chart
REVISION        UPDATED                         STATUS          CHART                   APP VERSION     DESCRIPTION
1               Thu Mar 20 20:39:39 2025        superseded      nginx-advance-0.1.0     1.16.0          Install complete
2               Thu Mar 20 20:46:27 2025        deployed        nginx-advance-0.2.0     1.16.0          Upgrade complete
In the CHART column we can see the version of the chart for each revision. The STATUS column gives us information about what revision is currently deployed and what was the final status of the previous revisions. The DESCRIPTION column gives additional information for each of the revisions.
To better make use of the versioning mechanism, let's start by updating the version parameter in the Chart.yaml file of our chart.
student@lab-helm:~/nginx-advanced$ cat Chart.yaml
apiVersion: v2
name: harder-chart
description: A Helm chart for Kubernetes

# A chart can be either an 'application' or a 'library' chart.
#
# Application charts are a collection of templates that can be packaged into versioned archives
# to be deployed.
#
# Library charts provide useful utilities or functions for the chart developer. They're included as
# a dependency of application charts to inject those utilities and functions into the rendering
# pipeline. Library charts do not define any templates and therefore cannot be deployed.
type: application

# This is the chart version. This version number should be incremented each time you make changes
# to the chart and its templates, including the app version.
# Versions are expected to follow Semantic Versioning (https://semver.org/)
version: 0.2.0

# This is the version number of the application being deployed. This version number should be
# incremented each time you make changes to the application. Versions are not expected to
# follow Semantic Versioning. They should reflect the version the application is using.
# It is recommended to use it with quotes.
appVersion: "1.16.0"
Once the version has been updated, let's update the index.html page by modifying its parameter value in values.yaml:
student@lab-helm:~/nginx-advance$ cat values.yaml
[...]
pageContent:
  indexPage: |
    <h1>This is the index.html page for version 0.2.0</h1>
[...]
Now let's upgrade the chart using helm upgrade:
student@lab-helm:~/nginx-advance$ helm upgrade nginx-chart .
student@lab-helm:~/nginx-advance$ helm history nginx-chart
REVISION        UPDATED                         STATUS          CHART                   APP VERSION     DESCRIPTION
1               Thu Mar 20 20:39:39 2025        superseded      harder-chart-0.1.0      1.16.0          Install complete
2               Thu Mar 20 20:46:27 2025        superseded      harder-chart-0.2.0      1.16.0          Upgrade complete
3               Thu Mar 20 22:03:35 2025        deployed        harder-chart-0.2.0      1.16.0          Upgrade complete
We can see that the chart has been upgraded. We can check this by accessing the page at http://localhost:8080.
Now let's rollback to a previous release. For this we will use helm rollback:
student@lab-helm:~/nginx-advance$ helm rollback nginx-chart
Rollback was a success! Happy Helming!
student@lab-helm:~/harder-chart$ helm history nginx-chart
REVISION        UPDATED                         STATUS          CHART                   APP VERSION     DESCRIPTION
1               Thu Mar 20 20:39:39 2025        superseded      harder-chart-0.1.0      1.16.0          Install complete
2               Thu Mar 20 20:46:27 2025        superseded      harder-chart-0.2.0      1.16.0          Upgrade complete
3               Thu Mar 20 22:03:35 2025        superseded      harder-chart-0.2.0      1.16.0          Upgrade complete
4               Thu Mar 20 22:09:29 2025        deployed        harder-chart-0.2.0      1.16.0          Rollback to 2
As we can see, we have rolled-back to REVISION 2, as described in the DESCRIPTION column.
Let's check this by accessing the index.html page as well: http://localhost:8080.
Do not forget to export POD_NAME and CONTAINER_PORT again, as before!
We can see that we have the previous version of the page now.
helm rollback nginx-chart or helm rollback nginx-chart 0 will rollback to the previous REVISION.
If you want to rollback to a specific revision, do: helm rollback nginx-chart [REVISION_NUMBER]
Helm Chart Packaging
We are now familiar with the way charts work and how to compose and deploy them. We will now move towards a more practical use case of Helm Charts, and that is creating custom charts and publishing them on private or public repositories to have them accessible for application deployments:
- To start, we will create a new project on our Gitlab.
Once logged in, go to the projects tab and create a new project.
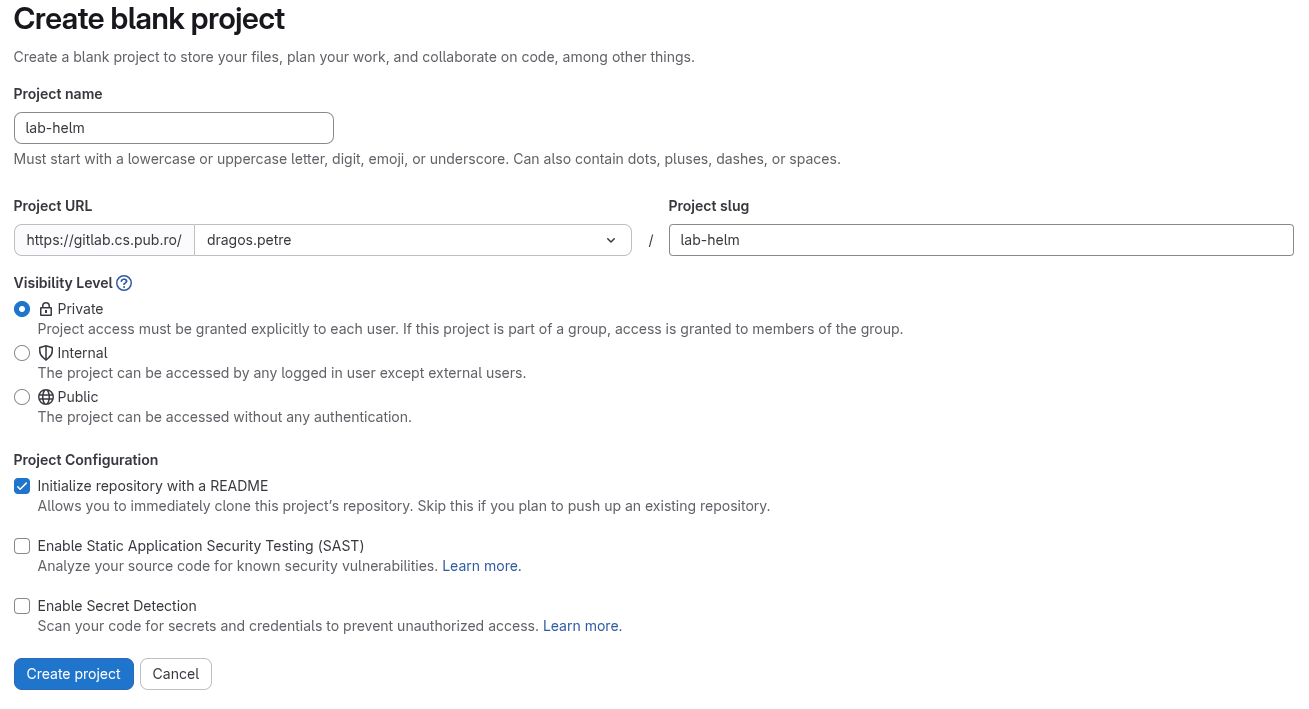
Click the
New Projectblue button on the upper right side of the screen and selectCreate blank projectfrom the opened menu.

- Give the project a suggestive name in the
Project namefield, and in theProject URLpress on the drop-down menu, scroll to theUserssection and select your username from there. You can leave all the other checkboxes as they are. Once done, you will see the new project created.
- Now that we are done with creating the project, the next step is to create an Access Token for our account.
If you already have one created, you can skip to the next part.
To create an Access Token, we will go on our profile to the Personal access token section.
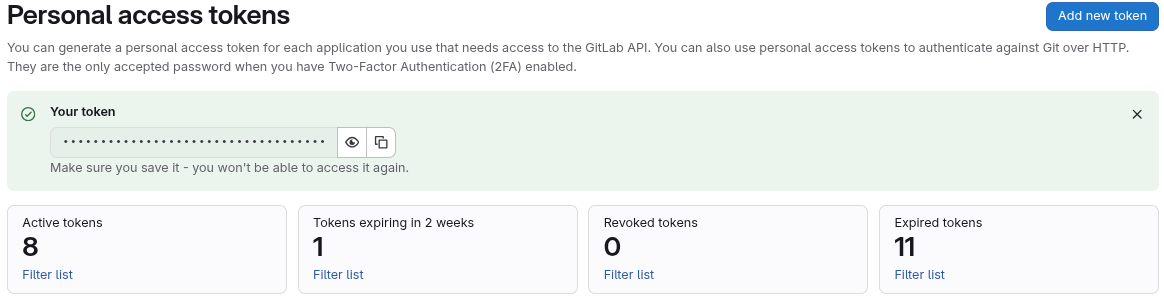
Here we will click on the
Add new tokenblue button on the upper-right side of the screen. This will open the token creation menu. From here we will give our token a name, we will modify the expiration date if we want to use it for a longer time (the default expiration date is one month). On theSelect scopessection we will check the boxes forread_repository,read_registry,read_api,write_repository,write_registry, andapi.

- Once these have been selected, press the
Create tokenbutton. This action will lead to a green box appearing and displaying the newly generated token. Copy the token and save it on your computer, it will be needed later.
Now that we have everything configured at this points, lets move on.
Creating an Application
The first step is to clone the newly created repository. Use git clone to clone it on VM and cd into it.
The second step is to create an application, containerize it, and publish it on the Container registry. The application we will create will be a Python Flask application serving as a web server with a simple endpoint that will print a message.
We will start with a very simple Hello, World! example.
Create in the cloned project a new file named app.py. This is a default name for a Flask application to ease its running, not requiring passing additional parameters when starting.
We aim to containerize the application so that we can deploy it inside a Kubernetes cluster.
To do this, we will use Docker.
But first, we need to create the Flask application so that it enables external access from outside the container.
The new application will look like this:
from flask import Flask

app = Flask(__name__)

@app.route("/")
def hello_world():
    return "<p>Hello, World!</p>"

if __name__ == "__main__":
    app.run(host="0.0.0.0", port=5000)
Now lets create a new file called Dockerfile in the root of the cloned repository.
This file will help us build the Docker container for our application.
# Use official Python image
FROM python:3.12-slim

# Set working directory
WORKDIR /app

# Copy requirements first (better layer caching)
COPY requirements.txt .

# Install dependencies
RUN pip install --no-cache-dir -r requirements.txt

# Copy application code
COPY app.py .

# Expose Flask port
EXPOSE 5000

# Set environment variables
ENV FLASK_APP=app.py
ENV FLASK_RUN_HOST=0.0.0.0

# Run the application
CMD ["flask", "run"]
And lastly, lets create a requirements.txt file to specify what dependencies need to be installed in our container.
Add in the requirements.txt file the following line.
flask==3.0.0
Once all these are done, our project should look like this:
student@lab-helm:~/cloned/repo$ tree .
./
├── app.py
├── requirements.txt
├── Dockerfile
└── README.md
The next step is to build our Docker container.
To do that, we will use the docker build command like this:
student@lab-helm:~/cloned/repo$ docker build -t my-flask-hello:latest .
Passing the -t argument to the docker build command will name and tag the resulting image, making it easier for us to identify and deploy it.
After the build process finishes, we can test our newly generate image.
To test it, we will user docker run to launch a container that will run our image.
student@lab-helm:~/cloned/repo$ docker run -p 5000:5000 my-flask-hello:latest
We passed -p 5000:5000 to bind port 5000 on our local machine to port 5000 of the docker container.
If you look back in the python code of our application and in the Dockerfile, you will notice that the application is told to run on port 5000 and the same port is exposed by the Dockerfile.
Once the docker container starts running, we can use curl to test the connection to our application.
student@lab-helm:~/cloned/repo$ curl http://localhost:5000
[...]
Hello, World!
Now that we confirmed that the application is running, we have to push the docker image to our container registry. To do this, we first have to name and tag our image correctly. We can follow the details given by Gitlab:
student@lab-helm:~/cloned/repo$ docker build -t gitlab.cs.pub.ro:5050/<username>/<repository-name> .
Now lets do a docker login to the Gitlab registry.
We will use our Gitlab username and for password we will the Access Token we have generated previously.
student@lab-helm:~/cloned/repo$ docker login gitlab.cs.pub.ro:5050 -u <username>
Password:
Once done, we will use the docker push command to publish our container.
student@lab-helm:~/cloned/repo$ docker push gitlab.cs.pub.ro:5050/<username>/<repository-name>
Once the image has been published, we can go to the Container Registry to check if it appears.
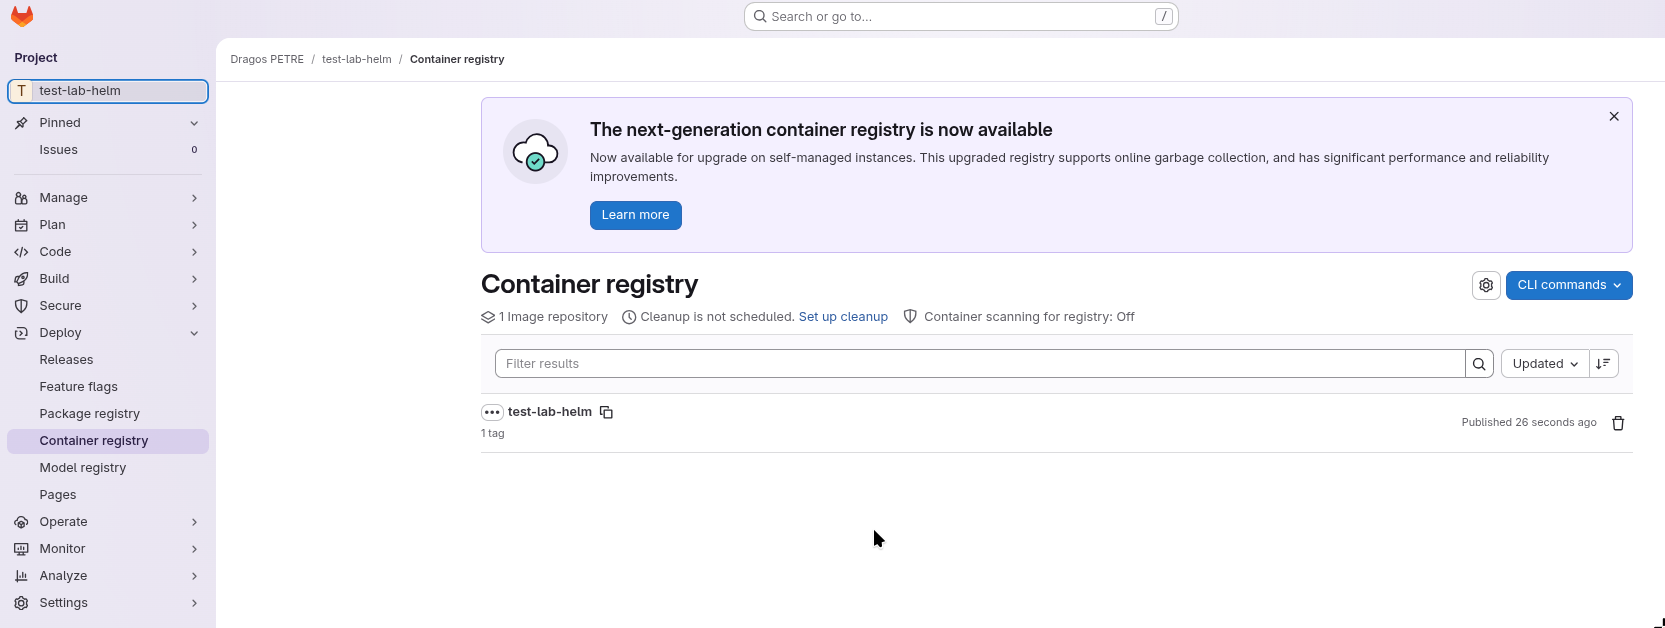
Chart Creation and Packaging
Now that we have our containerized application created and published in out Container Registry, we can move on to create the Helm chart.
We will create the chart using the helm create command.
student@lab-helm:~/cloned/repo$ helm create my-app-chart
This command will generate a Helm chart template for our application.
To ease our deployment, we will delete most of the files that are my-app-chart/templates (do not forget to remove the tests/ directory as well) and keep only the following:
templates/
├── deployment.yaml
├── service.yaml
└── _helpers.tpl
Now lets configure out Helm chart.
We will start by defining the default values for our chart.
We will do this by defining parameters and their values in the values.yaml file from the root of our chart.
You can replace the content of values.yaml with the following one:
replicaCount: 1

image:
  repository: gitlab.cs.pub.ro:5050/<username>/<repository-name>
  pullPolicy: Always
  tag: latest

service:
  type: ClusterIP
  port: 5000

containerPort: 5000

imagePullSecrets: [{ name: gitlab-secret }]

secretName: gitlab-secret

dockerConfigJsonEncoded:
Now lets modify our deployment in templates/deployment.yaml. You can use the following deployment:
apiVersion: apps/v1
kind: Deployment
metadata:
  name: {{ include "my-app-chart.fullname" . }}
  labels:
    {{- include "my-app-chart.labels" . | nindent 4 }}
spec:
  replicas: {{ .Values.replicaCount }}
  selector:
    matchLabels:
      {{- include "my-app-chart.selectorLabels" . | nindent 6 }}
  template:
    metadata:
      labels:
        {{- include "my-app-chart.labels" . | nindent 8 }}
    spec:
      {{- with .Values.imagePullSecrets }}
      imagePullSecrets:
        {{- toYaml . | nindent 8 }}
      {{- end }}
      containers:
        - name: {{ .Chart.Name }}
          image: "{{ .Values.image.repository }}:{{ .Values.image.tag | default .Chart.AppVersion }}"
          imagePullPolicy: {{ .Values.image.pullPolicy }}
          ports:
            - name: http
              containerPort: {{ .Values.service.port }}
              protocol: TCP
To enable pulling images from our registry, we need to configure a Kubernetes secret that enables authentication to the registry.
We will create in the templates folder a file named secret.yaml:
apiVersion: v1
kind: Secret
metadata:
  name: {{ .Values.secretName }}
data:
  .dockerconfigjson: {{ .Values.dockerConfigJsonEncoded }}
type: kubernetes.io/dockerconfigjson
Now we have to extract the docker configuration that contains our login to the registry and encode it in base64:
cat ~/.docker/config.json | base64 -w 0
Copy the result to the values.yaml files, as a value for the dockerConfigJsonEncoded variable.
Now lets update the service for our deployment. We will update the templates/service.yaml file:
apiVersion: v1
kind: Service
metadata:
  name: {{ include "my-app-chart.fullname" . }}
  labels:
    {{- include "my-app-chart.labels" . | nindent 4 }}
spec:
  type: {{ .Values.service.type }}
  ports:
    - port: {{ .Values.service.port }}
      targetPort: http
      protocol: TCP
      name: http
  selector:
    {{- include "my-app-chart.selectorLabels" . | nindent 4 }}
Now we have our chart finalized. We can validate it and render it so that we can see if everything is in place:
student@lab-helm:~/cloned/repo$ helm lint my-app-chart
student@lab-helm:~/cloned/repo$ helm template my-app ./my-app-chart
If everything is in place, we can move on to the next step: packaging.
Helm chart packaging is done using the helm package command.
It is a pretty straight forward process that creates a .tgz archive.
Helm charts are packaged as .tgz archives, and this is what we will publish to our Package Registry.
student@lab-helm:~/cloned/repo$ helm package my-app-chart
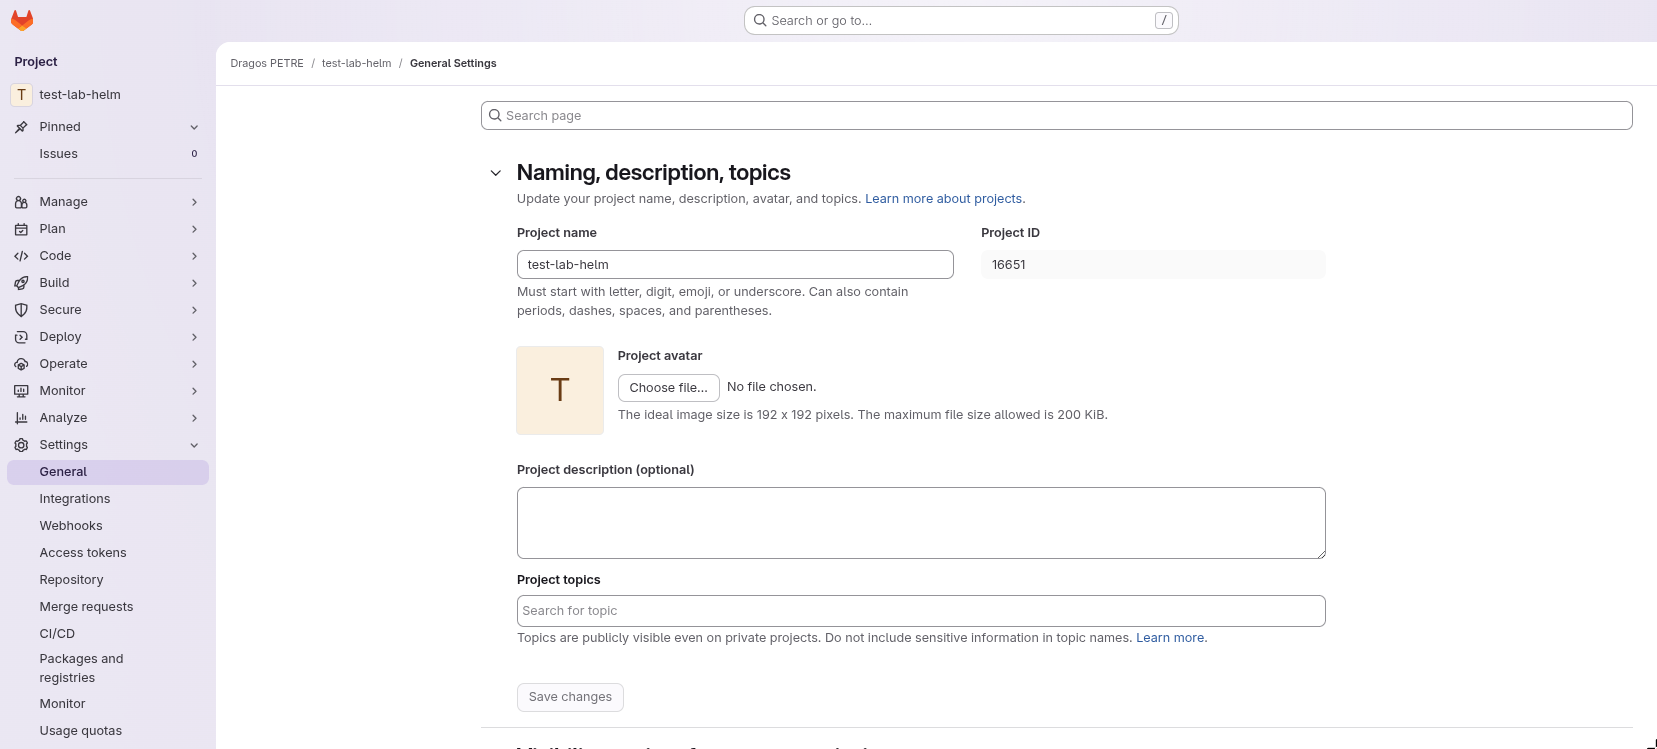
This will results in the creation of a file called: my-app-chart-0.1.0.tgz. Now we will publish the chart. To do this, the first step is to get the PROJECT ID for our Gitlab project. We can find it in the project's settings, in the General tab, under Naming, description, topics.
To publish the chart, we will use the Gitlab API.
The endpoint to our registry is the following: https://gitlab.cs.pub.ro/api/v4/projects/<PROJECT_ID>/packages/helm/api/stable/charts.
We will use the curl command to publish the chart:
student@lab-helm:~/cloned/repo$ curl --request POST \
  --user <username>:<token> \
  --form "chart=@my-app-chart-0.1.0.tgz" \
  "https://gitlab.cs.pub.ro/api/v4/projects/<PROJECT_ID>/packages/helm/api/stable/charts"
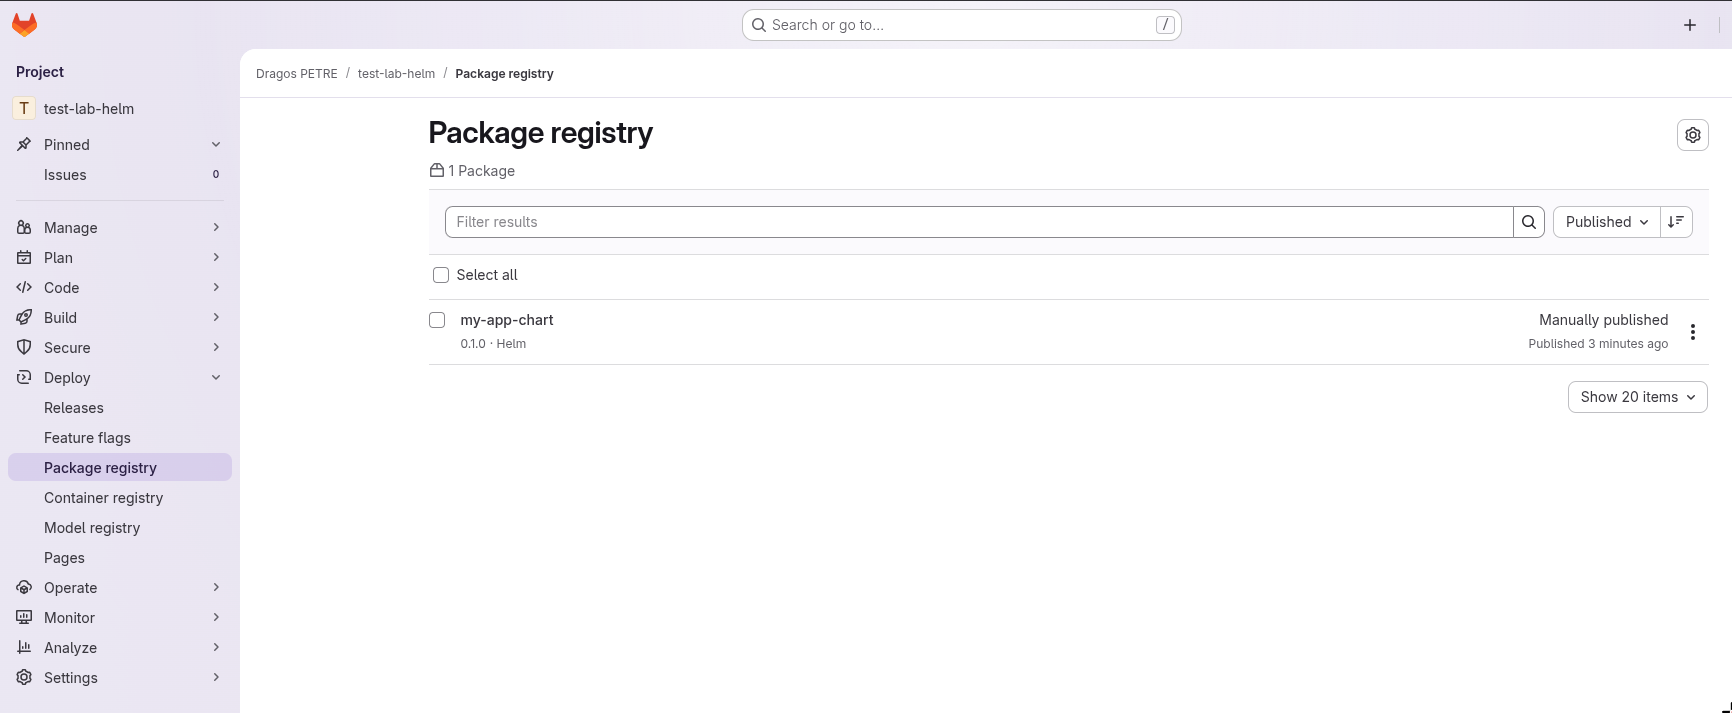
Once the upload is finished, we can check the Package Registry on our Gitlab project to see that the chart was successfully published.
Deploying the Chart
Now that we have a chart that it is published, we can try to deploy it on our machine.
We will start by adding the Gitlab registry to the known Helm sources so that we can pull from it.
We will use the helm repo add command:
student@lab-helm:~/cloned/repo$ helm repo add gitlab \
  --username <username> \
  --password <token> \
  https://gitlab.cs.pub.ro/api/v4/projects/<PROJECT_ID>/packages/helm/stable
And we will do a helm repo update to update the sources:
student@lab-helm:~/cloned/repo$ helm repo update
Now we can deploy our chart.
student@lab-helm:~/cloned/repo$ helm install my-app gitlab/my-app-chart
Now you can check the pods inside the cluster and see if they are running.
Lastly, lets try to connect to our application. We will start by doing port-forwarding between localhost and the pod/service that is running our application.
student@lab-helm:~/cloned/repo$ kubectl port-forward svc/my-app-my-app-chart 8080:5000 &
student@lab-helm:~/cloned/repo$ curl https://localhost:8080
Exercise: Deploy Custom Helm Chart
Following the previous steps, create a new helm chart of your choosing, package it, upload it, and then deploy it.